
Clean reinstallation of graphics device drivers
Introduction
Sometimes, graphics driver installations can get into a state which prevents the game from starting up correctly. There are many possible causes for this, ranging from an interrupted installation process, to driver corruption, etc. Although this situation has become much less common over the years, it can still happen occasionally.
From a player's perspective, this results in errors starting the game. The game will usually report a specific Exitcode, with the associated number differing depending on the underlying issue (note that not all Exitcodes indicate a driver installation issue!). In cases where part of a driver was simply not installed, it's also possible for it to appear as though nothing happens when you try to start the game (i.e. launching the game through Steam appears to do nothing), or it can result in a crash when starting the game which doesn't report an Exitcode at all.
Normally, the best way to try and resolve this is to simply reinstall (or upgrade to) the latest graphics card drivers. Occasionally, however, this doesn't fix the problem, even though the underlying issue still lies with the driver installation.
The following steps provide a walkthrough of our suggested procedure to perform a clean reinstallation of the graphics card drivers. This should almost completely rule out driver-related installation issues as a cause of problems with the game.
Note that there are alternatives to this approach, some of them making use of third-party tools to help with the procedure. Although some of these alternatives may seem easier to work with, we cannot provide instructions or support for such tools.
If you are instructed by the support team to perform a clean reinstallation of your drivers, we suggest that you follow the procedure described below first, before trying out alternative methods.
Step-by-step Procedure
Determine the system's graphics cards
The first thing to determine is the type(s) of graphics cards installed on your system. If you don't know what graphics card(s) your computer has, please establish this information first so that you know which drivers you need to install in the following steps. If you have contacted support, and were instructed to follow these steps, the team will have told you which graphics card(s) are installed on your system, and which drivers you should install.
If you are following these steps without first having been in contact with the support team, you can work out what graphics card(s) you have by running the dxdiag tool. To run this, just press the Windows button on the keyboard, enter dxdiag, and select to run the command.

The "DirectX Diagnostic Tool" window should appear, looking something like this:

On this screen, you will see one or more tabs named Display X (where X ranges from 1 to the number of detected display devices). Laptops frequently come with two such devices, a dedicated graphics card and an integrated one. Make a note of all the graphics cards shown, which will usually be one or more of the following: AMD, NVIDIA, and/or Intel.
Removing current drivers
Remove current Vulkan Runtime installations
After you have determined the type(s) of graphics cards that you have, you should remove any existing drivers, and any instance of the Vulkan Runtime. In cases where you might have previously installed a different graphics card and then later replaced it with a graphics card from a different manufacturer (e.g. replacing an AMD card with one from NVIDIA), you should take particular care to ensure that any left-over drivers for the previous device are uninstalled as well.
To remove the drivers, press the Windows button on the keyboard and enter "add remove".

This should bring up the option: "Add or remove programs". Click on it to bring up the Windows Settings dialog, where you can cleanly remove installed applications/drivers.
First, ensure that you don't have any custom Vulkan Runtime instances installed. In the search box, enter vulkan.
If this brings up any entries called Vulkan Run Time Libraries X.X.XX.X, please uninstall each of these, starting with the most recent version. For example, in the screenshot below, you would first uninstall version 1.0.54.0 and then 1.0.51.0. Be aware that there might be multiple instances of each version installed on your system. If you see the same entry after uninstalling a given version, just repeat it until the entry no longer shows up in the "Apps & features" list.

To uninstall the Vulkan Runtime libraries, select the entry and click on "Uninstall".

Confirm the selection by clicking on "Uninstall" again.

If another Windows confirmation dialog pops up at this point, confirm again by clicking on "Yes".

When the uninstallation has been completed, click on Close.

Remove AMD graphics card drivers
Next, look for the graphics card drivers. For AMD drivers, enter "AMD" in the search box. If this brings up one or more entries, make sure that you uninstall these AMD drivers. Matching entries for AMD are called: AMD Software. Do not uninstall any AMD Chipset drivers, as these are not related to the graphics card drivers. The AMD Radeon Settings entries can also be ignored (they may be uninstalled automatically as part of the process of uninstalling the AMD Software, but if they are not then there is no need to explicitly uninstall them).

Select the AMD Software entry and click on Uninstall, then confirm the selection by clicking on Uninstall again.
If another Windows confirmation dialog pops up at this point, confirm again by clicking on "Yes".
The uninstall tool should now start and display a dialog similar to the following, and you should click on "Uninstall":

This brings up a progress window.

Wait until the progress reaches 100% then select "Restart Now" in the final dialog.

At this point Windows may install default drivers for your AMD device. Allow this to complete, then confirm that the AMD Software entry and the Vulkan Runtime libraries entries are no longer in the Apps & features list.
Remove NVIDIA graphics card drivers
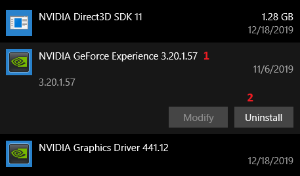
Next, look for the graphics card drivers. For NVIDIA drivers, enter "NVIDIA" in the search box. If this brings up one or more entries named "NVIDIA GeForce", as shown in the following screenshot, you should uninstall the entry called "NVIDIA Geforce Experience X.XX.X.XX" first (if present).

To uninstall NVIDIA GeForce Experience, select the entry (1) and click on "Uninstall" (2).
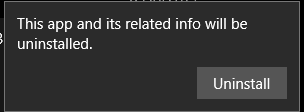
Confirm the intend by clicking Uninstall on the popup once more
If another Windows confirmation dialog pops up at this point, confirm again by clicking on "Yes".
This will start the uninstaller, where you have to click on "Uninstall" again.

This brings up a progress window.

Once the uninstallation has been completed, a dialog will appear to report the successful process.

Click on "Close".
Once you have removed this application, or if it wasn't installed on your system anyway, uninstall the NVIDIA Graphics Driver XXX.XX entry.
As before, select the entry in the Apps & features list (1) and click on "Uninstall" (2).

Confirm by clicking "Uninstall" again on the popup.
If another Windows confirmation dialog pops up at this point, confirm again by clicking on "Yes".
This starts the uninstallation tool. Wait until it has completed its preparations and the next confirmation dialog appears, then click on "Uninstall" again.

A progress window will appear, and your graphics card may reset (your screens will briefly go blank) at some point during this process. On a multi-monitor setup, monitors other than the main one may also go blank for a longer period.

On the next dialog, select "Restart Now" to restart the computer and completely remove any remaining driver components.

At this point Windows may install default drivers for your NVIDIA device. Allow this to complete, then confirm that the NVIDIA Graphics Driver entry and the Vulkan Runtime libraries entries are no longer in the Apps & features list.
Remove Intel graphics card drivers
If you have an Intel graphics card installed, please ensure that you uninstall the current drivers for that device as well.
Install the latest drivers for the graphics card
After uninstalling any old drivers, you need to install the latest ones.
If you have multiple graphics cards on your system, we recommend that you install drivers for any integrated graphics card (e.g. an Intel device) first, and those for the dedicated graphics card (e.g. an AMD or NVIDIA device) afterwards.
The latest drivers for AMD and NVIDIA graphics devices can be downloaded from the pages linked below.
Please note that although we cover the process of installing Intel graphics drivers here, the game only officially supports dedicated graphics devices, specifically those from AMD or NVIDIA. On systems which also have an integrated Intel graphics card, however, it is important to keep the drivers for that device up to date even though it is not used for the game, as it is possible that outdated drivers for an integrated graphics card may prevent the game from detecting the dedicated graphics card.
Also note that, although running the game on a system with only an Intel integrated graphics card is not officially supported, we (currently) do not actively prevent the game from starting on such a device. Some users may be able to run the game to their satisfaction on such a system, but WE DO NOT OFFICIALLY SUPPORT THIS and you should be aware that you may well run into problems and sub-optimal performance if you decide to so.
Installing Intel drivers
On the Download page, select the device installed on your system (as noted down in the first step).
Intel drivers are categorized by CPU generation.
First select Graphics Drivers on the Download page, then click on Products and select the CPU generation (e.g. 8th Generation for Coffee Lake CPUs). If you are unsure which generation your particular CPU is, check out the Wikipedia page, which has a good overview of which CPU corresponds to which CPU generation. Take care, however, as in some cases (especially for older CPUs), the model number and CPU generation can be ambiguous.
Once you have selected the CPU generation, select the actual product by clicking on Products again, and chose the graphics card from the list. Finally, pick the Operating System by clicking on the corresponding filter by entry.
Download the latest version of the driver and install it. Note that the Download page usually provides two versions: an exe-package and a zip-package. We recommend using the exe-package, as this is easier to install.
Once the driver installation has been completed, restart the system and try to run the game again.
Installing AMD drivers
On the Download page, select the device installed on your system (as noted down in the first step).
For example, if you have an AMD Radeon RX 5700 XT graphics card, select: Graphics -> AMD Radeon 5700 Series -> AMD Radeon RX 5700 Series -> AMD Radeon RX 5700 XT -> SUBMIT. Similarly, if you have an AMD Ryzen 5 3550H with an integrated Vega graphics device, select: Processors with graphics -> AMD Ryzen Processors -> AMD Ryzen 5 Mobile Processors with Radeon Vega Graphics -> AMD Ryzen 5 3550H -> SUBMIT
On the next page, you will need to select the correct Operating System (e.g. Windows 10 - 64-Bit Edition) and then the driver package that you want to install. In general, we recommend that you choose the Recommended driver in the list, which is also WHQL certified. However, you can also choose the Optional version, if you want to give that one a try instead. Click on download and then run the installer.
On the subsequent screens, just go through the steps indicated by the installer. If there is an option to perform a clean installation, select this option and make sure that you DO NOT deselect the Vulkan Runtime package. After the installation has been completed, restart your computer.
If, in addition to the AMD device, you also have a dedicated NVIDIA graphics card installed on your system, follow the steps in the next section of this page (Installing NVIDIA drivers). If the AMD device is the only graphics card on your system, you have finished, and hopefully the game will run without any problems for you.
Installing NVIDIA drivers
On the Download page, select the device installed on your system (as noted down in the first step).
For example, if you have an NVIDIA GeForce GTX 1080, select:
- Product Type: GeForce
- Product Series: GeForce 10 Series
- Product: GeForce GTX 1080
- Operating System: Your operating system
- Download Type: Game Ready Driver (GRD)
- Language: The language you want
Click on "Search" to get a list of the latest drivers for the selected combination.
On the next page, click the download button (confirm it once more by clicking Download again on the next page) and run the installer. If Windows asks for confirmation to run the installer, click on YES on the dialog.
Next, you will have to select a location into which to extract the installer files. Accept the default and click on OK.
A progress window will appear.

Wait until the process has been completed. Once completed, the actual installer will start by initiating a system check.

Once that has been completed, you can decide whether to install just the plain drivers, or the drivers along with the GeForce Experience package. Choose whatever you prefer, then click on AGREE AND CONTINUE.

On the next dialog select Custom (Advanced) and click on NEXT.

In the next dialog, all components should be selected. Also make sure that you tick the Perform a clean installation option before clicking on NEXT again.
Note: This option will reset any configuration settings that you might have set on your system. However, since you are performing the reinstallation of the graphics device drivers to fix some issue with the previous installation, setting this option is HIGHLY RECOMMENDED. If you would prefer to try without selecting it then you can do so, but if you still have trouble getting the game to start afterwards, we strongly recommend following the instructions on this page a second time, but this time enabling this setting.

The installer will now install all the driver components. Your graphics card may reset (your screens will briefly go blank) at some point during this process.
After the installation has been completed, you can adjust the settings on the final dialog before clicking on CLOSE.

Once you have done this, restart your computer.
You should now be able to start the game.