
Highways Modding Guide
By Manoeuvring with Difficulty / Stoats not Goats
Navigation
Zone Highways
Preparation
- Download the X-tools XR/X4 catalogue extraction tool from either steam (it’s available in ‘tools’) or the egosoft website
- Have a text editor on hand, my personal favourites are notepad++ and vscode
- Get familiar with the file structure of the base game, particularly everything within libraries and maps.
It is now prudent to setup a file structure which should be as follows
your_highway_mod | |||
libraries | maps | extensions | content.xml |
highwayconfigurations.xml | xu_ep2_universe | <mod/dlc_file_name> |
|
material_library.xml | zonehighways.xml | maps |
|
| sectors.xml | mod/dlc_sectors.xml |
|
Note: extensions is only required if modifying the sectors of a DLC or mod, be sure to follow the way sectors.xml is named in the original. For example for cradle of humanity its actually named dlc_terran_sectors.xml. Always follow the existing file convention if for whatever reason it is different from the template provided.
The inclusion of the libraries directory and its contents is optional and only relevant if the appearance of the highway is to be changed.
Getting Started
To get started open up zonehighways.xml with your editor and add the following:
<diff>
<add sel="/macros">
<!--We'll put highway macros here-->
</add>
</diff>
For those unfamiliar with the usage of <diff/> and <add/> it is well worth looking at the XML Patch Guide but in this guide most operations should be fairly self explanatory.
We now want to add a highway macro, to do that we need the following information:
- Highway name, I recommend keeping it consistent with the vanilla naming scheme
- Highwayxx_Clusteryyy_Sectorzzz_macro
- Entry and exit points
- Intermediate points with optional (but recommended) tangents
- Configuration is optional and is for aesthetic purposes
- All other nodes can remain empty
This information is to be added to the following template to the double quotes, e.g. <position x="" y="" z="" /> may be <position x="7000" y="-500" z="36.57" />
<component ref="standardzonehighway" />
<connections>
<connection ref="entrypoint">
<offset>
<position x="" y="" z="" />
</offset>
</connection>
<connection ref="exitpoint">
<offset>
<position x="" y="" z="" />
</offset>
</connection>
</connections>
<properties>
<boundaries>
<boundary class="splinetube">
<splineposition x="" y="" z="" tx="" ty="" tz="" weight="" inlength="0" outlength="" />
<splineposition x="" y="" z="" tx="" ty="" tz="" weight="" inlength="" outlength="" />
<splineposition x="" y="" z="" tx="" ty="" tz="" weight="" inlength="" outlength="" />
<splineposition x="" y="" z="" tx="" ty="" tz="" weight="" inlength="" outlength="0" />
<size r="200" />
</boundary>
</boundaries>
<controls>
<linear>
<time />
</linear>
<angular>
<roll />
</angular>
</controls>
<configuration ref="configuration_name" ring="0" />
</properties>
</macro>
Splines
The central section of zonehighways.xml denotes the shape of the highway and is contained within the boundary node, the boundary class is explicitly defined as a splinetube because a number of other elements like resource regions use the boundary node. The spline X4 uses is the cubic Bézier spline which is the same as the splines used in number of vector graphics packages like Adobe Illustrator so it can be handy to plan in equivalent software before putting co-ordinates into the XML. Within the boundary node there are splineposition nodes which store the following information on each explicitly defined point on the spline curve:
splineposition node | role |
|---|---|
x="" y="" z="" | Denotes the co-ordinates of the point measured in metres from the origin (the centre of the sector unless changed in sectors.xml). In X4 the XZ plane is the "horizontal" plane that most objects are located on within sectors. |
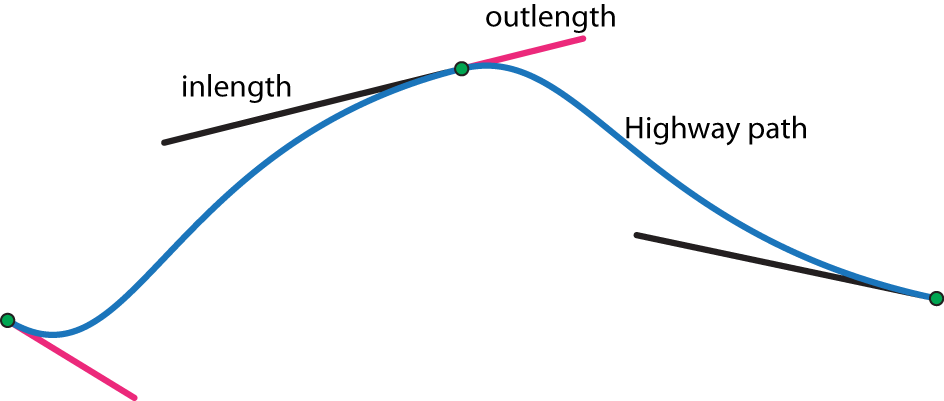
tx="" ty="" tz="" | The tangent to the spline at the point (x,y,z) expressed as the vector (tx,ty,tz) measured in metres. I recommend making the vector a unit vector to make working with in and outlengths much easier. |
weight="" | Affects the speed of the highway at the point (x,y,z). Its important to note that there isn't a linear relation between weight and speed setting all of the weights to 0 doesn't actually cause the velocity of the highway to be 0 along the entirety of its length, in this special case it actually sets the speed to a constant 10km/s which is generally undesirable because the exit speeds are a bit unwieldy. In vanilla X4 the control points are set with alternating values of 0 and 1 which keeps the speeds at a reasonable amount and the exit points are always set to 0 which gives a much slower and more comfortable exit. |
inlength="" & outlength="" | Inlength scales the side of the tangent vector that is "before" the point itself, this makes the curve closer to the tangent. Outlength does the same to the side that is "after" the point. In and outlength also has the affect of setting the speed gradent, longer in and outlengths make for smoother changes in speed. The initial inlength and final outlength must both be 0 to prevent issues. |
Diagrammatic representation of the splineposition node and its attributes
Adding Highways to Sectors
A lot of fiddling with highways comes down to selecting an appropriate placement for the highway in regards to the infrastructure already there, it may be desirable to have a highway go to a higher density resource region and back or perhaps have it go directly between jumpgates or even dip down below the ecliptic plane to give you a different perspective on a sector there are a lot of options, the trick comes from getting the co-ordinates of the features the highway should start nearby or pass by. Luckily Roguey's website features an interactive map that has the co-ordinates of certain objects available when hovering over them, it is important to note, however, that his website uses km and X4 uses metres so be sure to apply the scale factor in your splines. For plotting highways to resource regions either resourcedefinitions.xml may be used to get the exact co-ordinates for a given sector or guesswork and estimation may be used with jumpgates as a reference.
To actually get a highway into the game we take the highway macro in zonehighways.xml and reference it in sectors.xml (or equivalent DLC or mod xml). This is done in the following format
<connection name="Highwaynn_Cluster_xxx_Sectoryyy_connection" ref="zonehighways">
<offset>
<!--Allows for the highway to be offset from the positions specified in zonehighways.xml-->
<position x="" y="" z="" />
</offset>
<macro ref="Highwaynn_Cluster_xxx_Sectoryyy_macro" connection="sector">
<connections>
<connection ref="exitpoint">
<macro path="../../Zonezzz_Cluster_xxx_Sectoryyy_connection" connection="HighwaynnConnection02_gate" />
</connection>
<connection ref="entrypoint">
<macro path="../../Zonezzz_Cluster_xxx_Sectoryyy_connection" connection="HighwaynnConnection01_gate" />
</connection>
</connections>
</macro>
</connection>
</add>
</diff>
Cluster_xxx_Sectoryyy refers to the cluster (big hexagon) and sector (smaller hexagon) that the highway is to be placed in, for clusters with no smaller hexagons set "Sectorxxx" to "Sector001". The relation between the internal identification of the sector ID and the name is in libraries/map_defaults.xml for the basegame, DLC versions perform a diff patch on this library file so they are indentically named in their respective DLC directory.
The final trick with adding the defined highway to a sector is that the entrance and exit of a given highway must be in a zone, in vanilla zones are usually named Zone001 through to Zone006, check the co-ordinates of the existing vanilla, dlc or mod zones in the original sectors.xml to ensure the right zone is selected, choosing the wrong zone can cause debug log errors or the highway not to appear at all.
At this stage provided everything references everything else properly this should work as a mod if it is dropped in the extensions folder and has a proper content.xml, other resources can help with packing the mod correctly like euclid's Getting Started: Tools, Scripts and Modding.
Customising Highways
This section isn't a requirement for making highways but it goes through a bit of how they can be customised.
To customise a highway there are two elements required, a material definition which is used for changing the colour and texture of the lanes and a highway configuration which is used for applying the material definition as well as some other factors to the final highway.
Beginning with the material definition we begin by opening our material_library.xml and add the following:
<diff>
<add sel="//collection[@name='effects']">
<material name="material_name" shader="p1_complex_unlit_hw.fx" blendmode="SCREEN" preview="none">
<properties>
<property type="BitMap" name="diffuse_map" value="assets\textures\fx\gradient_08c_diff" />
<property type="Float" name="diffuseStr" value="5.0" />
<property type="Color" name="color_emissive" r="140" g="140" b="140" a="255" value="(color 255 255 255)" />
<property type="Float" name="camera_fade_range_near_start" value="10.0" />
<property type="Float" name="camera_fade_range_near_end" value="300.0" />
<property type="Float" name="camera_fade_range_far_start" value="400000.0" />
<property type="Float" name="camera_fade_range_far_end" value="520000.0" />
<property type="Integer" name="dblend1" value="1" />
<property type="BitMap" name="diffuse2_map" value="assets\textures\fx\pattern_hwl_01_diff" />
<property type="Float" name="diffuse2Str" value="1.0" />
<property type="Float" name="diffuse2_tiling" value="0.50" />
<property type="Float" name="diffuse2_tiling_v" value="1.052" />
<property type="Integer" name="dblend2" value="1" />
<property type="BitMap" name="diffuse3_map" value="assets\textures\fx\pattern_hwl_02_diff" />
<property type="Float" name="diffuse3Str" value="1.0" />
<property type="Float" name="diffuse3_tiling" value="0.30" />
<property type="Float" name="diffuse3_tiling_v" value="1.53" />
<property type="Float" name="base_brightness_shift" value="1.0" />
<property type="Float" name="base_contrast_shift" value="1.0" />
<property type="Float" name="base_saturation_shift" value="1.0" />
<property type="Float" name="base_hue_shift" value="0.0" />
<property type="Float" name="diff_anim_speed_u1" value="0.1" />
<property type="Float" name="diff_anim_speed_v1" value="-0.082" />
<property type="Float" name="diff_anim_speed_u2" value="-0.1" />
<property type="Float" name="diff_anim_speed_v2" value="-0.042" />
</properties>
</material>
</add>
</diff>
The main effects that are worth playing with are the emissive colour, contrast and brightness.
Next we open highwayconfigurations.xml to make a configuration that we can reference in zonehighways.xml
<diff>
<add sel="//configurations">
<configuration id="config_name">
<tubeconfiguration ref="tube_config_name" />
<motionblurconfiguration ref="local_hw_motionblur_config" />
<entryandexitgateconfiguration ref="local_hw_entry_exit_gate_config" />
<blockerconfiguration ref="empty_blocker_config" />
<boosterconfiguration ref="local_hw_booster_config" />
<trafficconfiguration ref="local_hw_traffic_config" />
<effectconfiguration ref="local_hw_effect_config" />
</configuration>
</add>
<add sel="//tubeconfigurations">
<tubeconfiguration id="tube_config_name" material="effects.material_name" macroname="props_he_local_highway_stream_02_macro" adsignmacroname="adsign_gen_signholder_01_macro">
<scaling maxplayerspeedscale="2" maxhighwayspeedscale="4" />
<fading fadeinfraction="0.08" fadeoutfraction="0.05" />
<edge material="effects.mwd_terran_highway_border" edgestartfraction="0.9" maxedgedeceleration="0.5" breakoutspeed="0.9" height="50" speedfactor="0.5" />
<acceleration base="0.005" decelerationfactor="250" />
<aifactor speed="0.05" acceleration="0.25" />
<part partname="anim_repeater" speed="5" />
<roll lookahead="2" factor="4" />
<mesh tiling="15000" tiling_blips="1000" static="0.015" maxsheer="2" sample="250" skip="10" />
</tubeconfiguration>
</add>
</diff>
When in doubt just leave most of the values as the defaults given here and just adjust elements one at a time. With a highway referencing this configuration you should be able to see the effects of what was changed in the material library.
Superhighways
Superhighways are incredibly similar to zonehighways in terms of how they operate mechanically but they use a separate set of files and have a couple of quirks that sets them apart. Players without experience or knowledge of the way the universe in X4 is structured should have a read of this guide Mechanics of X4's Map Design.
File Structure
For one the files that are being worked with are different to those for zonehighways and all levels of the galaxy is dealt with except for the galaxy.xml itself.
your_highway_mod | ||
maps | extensions (only for modding DLC/Mod clusters) | content.xml |
xu_ep2_universe | <mod/dlc_file_name> |
|
sechighways.xml | maps |
|
clusters.xml | mod/dlc_sechighways.xml |
|
sectors.xml | mod/dlc_clusters.xml |
|
zones.xml | mod/dlc_sectors.xml |
|
| mod/dlc_zones.xml |
|
Always follow the existing file convention if for whatever reason it is different from the template provided.
Getting Started
To get started it is critical to know the placement of the superhighway and exactly where it will go before working with any of the files particularly the start and end points. This is because in every file but zones.xml the co-ordinates of the superhighway are defined in some capacity and it is really unpleasant to find out that the superhighway is in the wrong spot and offsets need to be applied all over again 3 times. All superhighway co-ordinates are defined relative the origin of the cluster with the sole exception of the location of SHConX1 and SHconX2 which are defined relative to the sector origin (but that becomes apparent from the structure).
While all superhighways in X4 are linear they actually are cubic Bézier splines just like zonehighways so you can get them to spiral all over the place (look to X Rebirth for inspiration). This means that a lot of vector graphic software packages like Adobe Illustrator and free equivalents can be used for prototyping.
Clusters
Author's Note: I really struggled to think of what to start with first with files, you may find it better to start with sechighways if your more confident with the shape but don't want to connect everything up until last
Starting from the top Clusters.xml is used to tell the game the following:
- A superhighway exists in the cluster
- How far the superhighway is offset from the origin of the cluster (if you use exact co-ordinates within the cluster later in sectors.xml you can set this to 0)
- The location of the superhighway entrance and exit (it is possible have a superhighway travel within the same sector).
Here's an example code block that is adding a superhighway to an existing cluster:
<diff>
<add sel="//macros/macro[@name='Cluster_xxx_macro']/connections">
<connection name="SuperHighwaynn_Clusterxxx_connection" ref="sechighways">
<offset>
<position x="" y="" z=""/>
</offset>
<macro ref="SuperHighwaynn_Clusterxxx_macro" connection="cluster">
<connections>
<connection ref="entrypoint">
<macro ref="tzoneCluster_xxx_Sectoryyy1SHConX1_GateZone_macro" path="../../Cluster_xxx_Sectoryyy1_connection/tzoneCluster_xxx_Sectoryyy1SHConX1_GateZone_connection" connection="exitpoint1"/>
</connection>
<connection ref="exitpoint">
<macro ref="tzoneCluster_xxx_Sectoryyy2SHConX2_GateZone_macro" path="../../Cluster_xxxx_Sectoryyy2_connection/tzoneCluster_xxx_Sectoryyy2SHConX2_GateZone_connection" connection="entrypoint1"/>
</connection>
</connections>
</macro>
</connection>
</add>
</diff>
Substitute for the following variables:
- xxx - 2 or 3 digit cluster number (for vanilla or DLCs), for mods check the convention used
- nn - 2 digit number for the highway number, do not re-use within a given cluster
- yyy1 - 3 digit entry sector number (for vanilla or DLCs), for mods check the convention used
- yyy2 - 3 digit exit sector number (for vanilla or DLCs), for mods check the convention used (can be the same as yyy1 for intra-sector travel)
- X1 - 1 or 2 digit number representing the entry gate, do not re-use within a given sector
- X2 - 1 or 2 digit number representing the exit, do not re-use within a given sector
In vanilla for SHConX values even numbers are usually used for entrances and the preceding odd number is used for exits (3,4,5,6,9,10 are the values vanilla uses). There is no requirement to follow this convention and the game will accept any suffix but for consistency and compatibility for other mods it is good practice to follow the convention already established.
Sectors
Working down the universe hierarchy sectors.xml deals with the location of the entry and exit gates again but this time it is relative to the sector origin as opposed to the cluster origin, as such do not factor in any offsets that clusters.xml applies to the highway.
An example sectors.xml is as follows:
<diff>
<add sel="//macros/macro[@name='Cluster_xxx_Sectoryyy1_macro']/connections">
<connection name="tzoneCluster_xxx_Sectoryyy1SHConX1_GateZone_connection" ref="zones">
<offset>
<position x="" y="" z=""/> <!--Relative to sector origin-->
</offset>
<macro ref="tzoneCluster_xxx_Sectoryyy1SHConX1_GateZone_macro" connection="sector"/>
</connection>
</add>
<add sel="//macros/macro[@name='Cluster_xxx_Sectoryyy2_macro']/connections">
<connection name="tzoneCluster_xxx_Sectoryyy2SHConX2_GateZone_connection" ref="zones">
<offset>
<position x="" y="" z=""/> <!--Relative to sector origin-->
</offset>
<macro ref="tzoneCluster_xxx_Sectoryyy2SHConX2_GateZone_macro" connection="sector"/>
</connection>
</add>
</diff>
Zones
At the lowest level of map design all is required is a reference to the sectors.xml and noting the macro used for the gate (SHCon*). The only trick is to use "tzone" instead of "zone" which is the convention vanilla uses.
An example zones.xml is as follows:
<diff>
<add sel="//macros">
<macro name="tzoneCluster_xxx_Sectoryyy1SHConX1_GateZone_macro" class="zone">
<component ref="standardzone"/>
<connections>
<connection ref="SHConX1_gate"/>
</connections>
</macro>
<macro name="tzoneCluster_xxx_Sectoryyy2SHConX2_GateZone_macro" class="zone">
<component ref="standardzone"/>
<connections>
<connection ref="SHConX2_gate"/>
</connections>
</macro>
</add>
</diff>
This is a great point to check for typos and ensure all connections have the correct addresses.
Sechighways
No superhighway is complete without its shape defined whether it be a simple linear path between sectors or a more extreme route. Much of the file is identical to zonehighways.xml so the main thing to bear in mind is that co-ordinates in this file are all relative to the offset specified in clusters.xml. As always here's an example template:
<diff>
<add sel="//macros">
<macro name="SuperHighwaynn_Clusterxxx_macro" class="highway">
<component ref="standardsechighway" />
<connections>
<connection ref="exitpoint">
<offset>
<position x="" y="" z="" />
</offset>
</connection>
<connection ref="entrypoint">
<offset>
<position x="" y="" z="" />
</offset>
</connection>
</connections>
<properties>
<boundaries>
<boundary class="splinetube">
<splineposition x="" y="" z="" tx="" ty="" tz="" weight="" inlength="0" outlength="" />
<splineposition x="" y="" z="" tx="" ty="" tz="" weight="" inlength="" outlength="" />
<splineposition x="" y="" z="" tx="" ty="" tz="" weight="" inlength="" outlength="" />
<splineposition x="" y="" z="" tx="" ty="" tz="" weight="" inlength="" outlength="0" />
<size r="300" />
</boundary>
</boundaries>
<controls>
<linear>
<time />
</linear>
<angular>
<roll />
</angular>
</controls>
</properties>
</macro>
</add>
</diff>
Finally, its worth noting with superhighways that their highwayconfigurations.xml can be changed just like with zone highways and it was through this method that I removed the orange energy balls from the path that are a legacy of X Rebirth in my mod "Cleaner Superhighways". The reason why this guide doesn't go into detail on that front is because a lot of the zonehighway stuff still applies and a lot of the visual changes that are easiest to make (like changing the tube colour) are only observed when inside the superhighway, so not for extended periods of time.
Conclusion
This concludes my Highway Modding Guide, I hope it was helpful and informative, if you want to see examples of highway mods to replicate feel free to extract and look through my highway mods.
Further Resources
- Mechanics of X4's Map Design - Manoeuvring with Difficulty / Stoats not Goats
- Universe Creation in X4 - enenra
- The Beauty of Beziér Curves (animated video) - Freya Homlér (More in-depth than necessary to understand X4's splines but it is still a great resource)