
Combat And Weapons
- Fight
- Combat
- Weapon Types
- Turret Settings
- Defence Drones
- Attacking specific station modules
- Loot
- Fleet Management
- Fleet subordinates
- Formations
- Backward Cross (2 stars)
- Backward X-shape (2 stars)
- Circle (0 star)
- Cross (2 stars)
- Eagle (4 stars)
- Echelon (5 stars)
- Forward Cross (2 stars)
- Forward X-shape (2 stars)
- Horizontal Dart (5 stars)
- Inverse Point Guard (3 stars)
- Inverse V-shape (1 star)
- Line Abreast (0 star)
- Line Astern (0 star)
- Point Guard (3 stars)
- Semicircle (0 star)
- Triangle (1 star)
- Twin (4 stars)
- V-shape (1 star)
- Vertical Dart (5 stars)
- Vulcan (5 stars)
- W-shape (4 stars)
- X-shape (2 stars)
Fight
History has always been written by the victor and great treasures await those willing to take them by force. Whether it is defending player owned traders from marauding pirates or galactic conquest there will always be plenty of reasons to be armed and dangerous. Some fights end in destruction, others lead to capturing ships or conquering sectors.
Combat
Ships armed with frontal weapons, turrets and Defense Drones can attack other ships to deal damage to them. Shields will absorb damage taken until they are depleted, but will start to recharge after not having taken damage for a period of time. Some shields protect ship hulls, whilst others can protect nearby ship systems on larger ships.
Individual surface elements on Large and Extra Large ships can be targeted to disable them, however these may also have their own independent shielding. Once shields are depleted the ship or surface element will start taking hull damage from landed hits. If the hull 'hitpoints' of a surface element reaches 0 it is disabled until repaired; if the ship's hull HP reaches 0 it will blow up, destroying the ship (and if the player was on-board it will result in a Game Over).
The player is free to customise the turret loadouts of all ships, and the main weapons of Small and Medium Ships (see the Weapon Configuration part of the Ship Interactions Menu). This allows the player to tailor the roles of ships, or sub-sections of ships, for specific roles (e.g. high damage and long range, or accurate short range weapons). Most ships have blind spots from which they can not attack making ideal spots for their enemies to manoeuvre into. Although an individual ship can be good at duelling opponents, superior numbers are another way to win battles.
Weapon Types
Weapons fall into 5 general categories
- Main weapons:
- Primary Guns (forward-facing weapons on S, M,L ships and some battleships)
- Secondary Launchers (forward-facing weapons on S and M ships)
- Gun Turrets (available on M, L and XL ships)
- Missile Turrets (available on L and XL ships)
- Defence Drones (deployable from some M, L and XL ships)
Main weapons are controlled by the player when captaining their ship, and Defence Drones will deploy automatically to protect their mothership if piloted by an NPC.
Main Weapon Aiming (Guns)
The game settings contain an option called player-assist 'target target' mode (enabled by default). When enabled, player-controlled primary guns will automatically fire at a leading point to intercept the position the target is flying towards. The same approach is taken automatically by ship-controlled gun turrets. When 'target target' mode is not enabled, or when manually aiming, main guns will fire at the cursor's position.
Main Weapon Aiming (Missiles)
Player-controlled (forward-facing), secondary launchers equipped with dumbfire missiles will fire at the cursor's position. When equipped with homing missiles, secondary launchers use a missile lock HUD marker to automatically try and lock on to the playership's target. Secondary launchers are fired with the "L" key.
Main Weapon Firegroups
Under Ship Information, "Weapon Configuration", Weapon (i.e. S Pulse Laser Mk1), there are 2 sets of 4 boxes. These are labeled Primary and Secondary (see above).
Those four boxes are where you can setup the main weapon's Primary and Secondary Firegroups. You can put a weapon into all 8 firegroups if you wish.
The firegroups are toggled using Hotkeys:
- Change Primary Firegroup: 1/2/3/4
- Change Secondary Firegroup 5/6/7/8
Main Weapon Heat
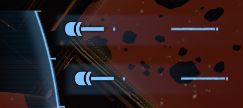
When primary guns are fired they generate heat, which the ship must dissipate in order maintain combat efficiency. When multiple weapons are fitted and used simultaneously, larger amounts of heat are accumulated and it takes the ship longer to dissipate it. The impact of firing multiple guns is visualised by the heat bar to the right of each weapon icon on the HUD (see images below).
When shooting for short periods of time, heat build-up usually isn't an issue, and primary guns DPS is the "Burst Weapon Output" listed in the ship purchase/upgrade menus. When fired for longer, especially when several are fired together, heat can force primary guns to shutdown temporarily. When firing over long periods leading to overheating (and weapon shutdowns), primary guns DPS is reduced to the "Sustained Weapon Output" (please note that at this time, the ship purchase/upgrade menus lists incorrect sustained MW values).
Minor heat buildup (bar the on right is short)
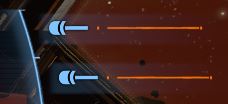
Heavy Heat buildup (bar is long, and orange)
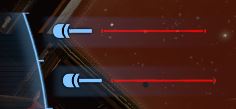
Overheated (bar is red, and weapons have shutdown)
Turret Settings
Turret Rules of Engagement:
- Turret offline
 : Will not take any action
 - Turret online
 : Will take the actions below:
- Attack Enemies
 : Attack any hostiles
 - Target Target
 : Will only attack the selected target if it is hostile
 - Defend Ship
 : Returns fire on things that attacks the ship (not missiles)
 - Missile Defence
 : Will only try to intercept incoming missiles (not ships) - [X3 'Missiles Only' mode]
 - Break Asteroids
 : Supports mining solid materials
- Attack Enemies
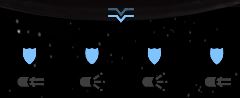
HUD Controls for Turrets on Medium ships:
Depending on ship model, there may be 2-4 turrets
- Their per-turret settings icons are found at the top-middle of the screen:
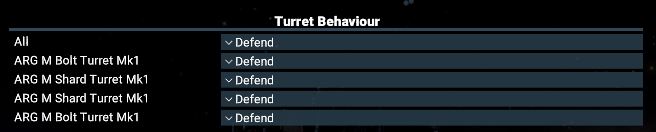
Full Controls for All Ships:
- Customisable turret controls for all ships
- Each Turret, or Turret Group (pairs of Mediums), have settings:
- Each setting offers the same options as the HUD Controls above
- Additionally, there is a setting that to apply an option to all turrets
- Available on two places via drop-down menus:
- Piloted ship: Ship Menu (click on the chevron in top-centre of screen):
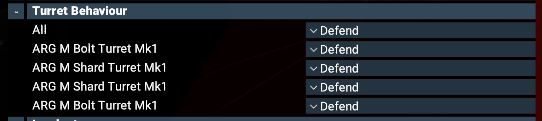
- All owned ships: Ship Info Menu (locate Turret Behaviour settings are near the bottom):
- Piloted ship: Ship Menu (click on the chevron in top-centre of screen):
Defence Drones
These small craft can be equipped to, and operated by, ships with Small Docks (Frigates, Large and XL Ships).
Summary of capabilities:
- Cheap (~15,000 Cr)
- Equipped with a Pulse Laser Mk1
- Scout-level hull integrity (1,900 MJ)
- Do not have shields
- Auto-repaired by their motherships after docking
Attacking specific station modules
It is possible to order ships on the Playership's Wing to attack specific modules. For example, Storage, Defence or Administrate modules.
Process for doing this:
- Open the Map
- Expand the station's info so that you can see specific modules (see image below)
- Left click on the module you wish to attack
- Right-click on the Playership (or specific ship in Wing) and select "Wing: Attack My Target"
- If this order is not available, re-select the module, press "T", and try again
Loot
Hacking or destroying ships and station storage modules will cause them to drop a proportion of their cargo for other ships to collect. Collecting wares dropped from a station is considered theft, so the station may turn hostile with any ships that do. NPC ships also have a chance to drop wares for the player inventory dependent on the type and faction of ship killed.
Fleet Management
Ships can form hierarchical groups. A leader followed by several "wingmen", often referred to as a squad(ron), but also multiple levels deep as soon as a leader of one group itself follows instructions of another leader.
Setting up such a fleet can be done the easiest by selecting one or multiple ships which are supposed to be the followers on the map, then right clicking on the new leader. The context menu will now show ASSIGNMENT options such as the new behaviour to DEFEND this leader. Selecting this option will move all these ships into the hierarchy of this leader. A plus + symbol now appear in front of the leader ship in the OBJECT LIST as well as the PROPERTY OWNED menus at the side of the map.
Ships which are in such a squad or fleet can still receive and execute explicit player orders. These orders would overwrite their current behaviour to follow their "boss" for their duration. This way a player can use any ship for a trade run or overwrite their targets during a battle.
When ships are in a squad or fleet, they can also fly in formations. The command order menu of the leader, does allow selection of the currently used formation.
Fleet subordinates
Formations
Breakdown of each formation as of version 4.00.
First screenshot is from the top (default map view) and the second is a perspective trying to show space usage.
Most of those screenshots are with a fleet of 20 ships.
Each formation requires a skill level, indicated in parenthesis after the name.
Backward Cross (2 stars)


Backward X-shape (2 stars)


Circle (0 star)


Cross (2 stars)


Eagle (4 stars)


Echelon (5 stars)


Forward Cross (2 stars)


Forward X-shape (2 stars)


Horizontal Dart (5 stars)


Inverse Point Guard (3 stars)


Inverse V-shape (1 star)


Line Abreast (0 star)


Line Astern (0 star)


Point Guard (3 stars)


Semicircle (0 star)


Triangle (1 star)


Twin (4 stars)


V-shape (1 star)


Vertical Dart (5 stars)


Vulcan (5 stars)


W-shape (4 stars)


X-shape (2 stars)


Subordinate group modes:
Attack - Ships will attack their commander's target.
Intercept - Ships will attack any hostile non-capital ships that come into their operational range*.
Defend - Prior escort behavior before new modes were implemented. Think of this as automatic mode. Subordinate behavior depends a lot on what their commander is doing at the time.
Docked - Orders all subordinates in the specified group to dock and ignore all targets including their commanders' attackers. Does not affect ships that are unable to dock at their commander.
Launched - Orders all subordinates in the specified group to act on their specified behavior. (Note that for fighters subordinate to a carrier, this may mean that they stay docked at their commander.)
On those last two, please note the bug acknowledged in the post right above this one. You should get the fix for that bug in a future update.
* Operational range is always their commander's radar range. This was implemented this way for clarity since this is what you see as what your ship is aware of.
Taken from here: https://forum.egosoft.com/viewtopic.php?f=192&t=421644&start=15#p4908844